JavaSpring学习笔记_2022年版
[TOC]
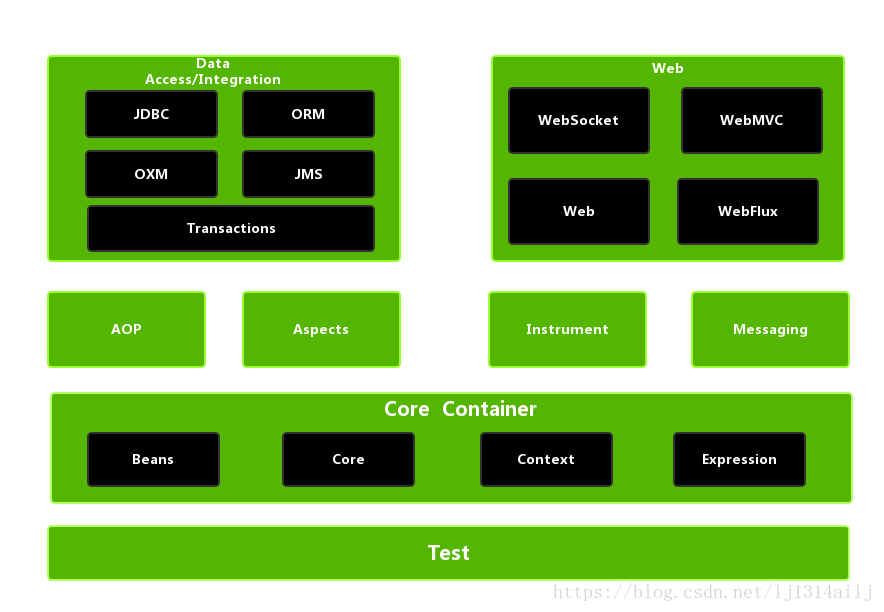
Sping框架的概述
基本概述
-
javaSpring是轻量级的开源的JavbaEE框架
Spring可以解决企业开发的复杂性
Spring有两大核心部分:
- IOC:控制反转,把创建对象交给Spirng进行管理
- Aop:面向切面,不修改源代码的情况下进行功能的增强
-
- 方便耦合,简化开发
- Aop编程支持
- 方便程序测试
- 方便和其他框架进行整合
- 降低API开发难度
spring认识
通过spring创建对象
1 | |
创建spring的配置文件(床创建类的xml文件):
- ```xml
2
3
4
5
6
2. 将spring的配置文件引入java文件
- ```java
ApplicationContext context =
new ClassPathXmlApplicationContext("springTest1//bean1.xml");
类的创建
- ```java User user = context.getBean("user",User.class);
2
3
4
5
6
7
8
9
10
11
12
13
14
15
16
17
18
19
20
21
22
23
24
25
26
27
28
29
30
31
32
33
34
35
36
37
38
39
40
41
42
43
44
45
46
47
48
49
50
### IOC模块
- [ ] IOC底层原理
- [ ] IOC接口(BeanFactory)
- [ ] IOC操作(基于XML / 注解)
#### 概念和原理
- [ ] 什么是IOC
- 控制反转,把对象的创建和对象之间的调用过程,交给Sring进行处理
- 使用IOC的目的,为了耦合度的降低
- [ ] IOC的底层原理
- xml解析,工厂模式,java反射
#### IOC接口
- [ ] BeanFactory:
- IOC容器实现的基本接口,不提供给开发人员使用
- 在加载配置文件时不会创建对象
- [ ] ApplicationContext:
- BeanFactory接口的子接口,提供更强大的功能
- 在加载配置文件时就会创建对象
- 两个基本的实现类:
1. ClassPathXmlApplicationContext():相对路径(使用ClassLoader加载)
2. FileSystemPathXmlApplicationContext():绝对路径(使用InputStream加载)
#### IOC操作Bean管理操作
##### 什么是Bean管理
- Bean管理指的是两个操作:
1. Spring创建对象
2. Spring注入属性
##### 基于xml方式
- [ ] 基于xml的对象构造:
```xml
<bean id="user" class="springTest1.User"></bean> <!-- 默认调用无参构造函数 -->
- 在sprng的配置文件中使用bean标签,标签里添加对应的属性,就可以实现对象的创建
- 在bean中有很多属性,介绍常用的属性:
1. id属性:唯一标识
2. class属性:类的全路径<package-class>
3. name属性:可以完成和id属性相同的作用,和id属性唯一的区别为在name属性中可以添加特殊符号,而在id属性中不可以添加特殊符号
- 默认执行无参构造方法-
DI:依赖注入,注入属性
第一种注入方式:使用Set方法进行注入
1
2
3
4<bean id="book" class="springTest1.Book"> <!-- 先有对象才有属性 -->
<property name="bAuthor" value="YCH"></property>
<property name="bName" value="diao"></property>
</bean>1
2
3
4
5
6
7
8
9
10
11
12
13
14
15
16
17
18
19
20
21
22
23
24
25
26public class Book {
public Book(){
}
private String bName;
private String bAuthor;
public void setbName(String bName) {
this.bName = bName;
}
public void setbAuthor(String bAuthor) {
this.bAuthor = bAuthor;
}
public String getbName() {
return bName;
}
public String getbAuthor() {
return bAuthor;
}
}1
2
3
4
5
6@Test
public void test2(){
ApplicationContext context = new ClassPathXmlApplicationContext("springTest1//bean1.xml");
Book book = context.getBean("book",Book.class);
System.out.println(book.getbAuthor() + " " + book.getbName());
}第二中注入方式:使用有参构造方法进行注入
1
2
3
4
5
6
7
8
9
10<!-- 属性注入 (有参构造方式方式) -->
<bean id="book1" class="springTest1.Book">
<constructor-arg name="bAuthor" value="ych"></constructor-arg>
<constructor-arg name="bName" value="ddd"></constructor-arg>
<!--
<constructor-arg index="0" value="ddd"></constructor-arg> 也可以进行属性注入,此时index为有参构造的顺序
-->
</bean>1
2
3
4
5
6
7@Test
public void test3(){
ApplicationContext context =
new ClassPathXmlApplicationContext("springTest1//bean1.xml");
Book book = context.getBean("book1",Book.class);
System.out.println(book.getbAuthor());
}- Tips:若在一个xml配置文件中既是用了Set方式又使用了有参构造方式,配置文件的id需要为不同的ID
P名称空间注入:
1
2
3
4
5
6
7
8
9<!-- 添加xml相关约束(p约束) -->
<beans xmlns="http://www.springframework.org/schema/beans"
xmlns:p="http://www.springframework.org/schema/p"
xmlns:xsi="http://www.w3.org/2001/XMLSchema-instance" xmlns:util="http://www.springframework.org/schema/util"
xsi:schemaLocation="http://www.springframework.org/schema/beans http://www.springframework.org/schema/beans/spring-beans.xsd http://www.springframework.org/schema/util https://www.springframework.org/schema/util/spring-util.xsd">
<!-- 配置对象的创建 -->
<bean id="user" class="springTest1.User"></bean>1
2
3
4
5
6
7
8@Test
public void test4(){
ApplicationContext context =
new ClassPathXmlApplicationContext("springTest1//bean1.xml");
Book book = context.getBean("book2",Book.class);
System.out.println(book.getbAuthor());
}
基于xml的其他类型属性注入
属性值为空值:
1
2
3
4
5<bean id="book3" class="springTest1.Book">
<property name="bName">
<null/>
</property>
</bean>属性值中有特殊符号:
使用转义符:>,<
使用CDATA
1
2
3
4
5<bean id="book4" class="springTest1.Book">
<property name="bName" >
<value><![CDATA[<<北京>>]]></value>
</property>
</bean>
外部注入(属性为类的注入 / 外部bean):
1
2
3
4
5
6
<bean id="service" class="springTest2.UserService.Service">
<property name="user" ref="user"></property>
</bean>
<bean id="user" class="springTest2.UserDao.UserDaoImp"></bean>1
2
3
4
5
6
7
8@Test
public void test1(){
ApplicationContext context =
new ClassPathXmlApplicationContext("springTest2//inject.xml");
UserDao user= context.getBean("service", Service.class).getUser();
System.out.println(user);
}内部注入:
1
2
3
4
5
6
7
8<bean id="emp" class="springTest2.Emp.Emp">
<property name="name" value="ych"></property>
<property name="dept">
<bean id="dept" class="springTest2.Dept.Dept">
<property name="name" value="666"></property>
</bean>
</property>1
2
3
4
5
6
7
8
9
10
11
12
13
14
15
16
17
18
19
20
21
22
23
24
25
26
27
28
29
30
31public class Dept {
private String name;
public void setName(String name) {
this.name = name;
}
public String getName() {
return name;
}
}
public class Emp {
Dept dept;
String name;
public void setDept(Dept dept) {
this.dept = dept;
}
public void setName(String name) {
this.name = name;
}
public Dept getDept() {
return dept;
}
}级联注入:
第一种方式和外部注入相似
给类属性的属性赋值:
- 前提:需要对属性的主类设置相应属性的get方法
1
2
3
4
5<bean id="emp2" class="springTest2.Emp.Emp">
<property name="dept" ref="dept"></property>
<property name="dept.name" value="cs"></property>
</bean>
<bean id="dept" class="springTest2.Dept.Dept"></bean>1
2
3
4
5
6
7
8
9
10
11
12
13
14
15
16
17
18
19
20
21
22
23
24
25
26
27@Test
public void test3(){
ApplicationContext context =
new ClassPathXmlApplicationContext("springTest2//inject.xml");
Emp emp = context.getBean("emp2",Emp.class);
System.out.println(emp.getDept().getName());
}
public class Emp {
Dept dept;
String name;
public void setDept(Dept dept) {
this.dept = dept;
}
public void setName(String name) {
this.name = name;
}
public Dept getDept() {
return dept;
}
}
集合注入:
1
2
3
4
5
6
7
8
9
10
11
12
13
14
15
16
17
18
19
20
21
22
23
24
25
26
27
28
29
30<bean id="stu" class="springTest3.Stu">
<property name="list">
<list>
<ref bean="course1"></ref>
<ref bean="course2"></ref>
</list>
</property>
<property name="set">
<set>
<value>666</value>
<value>555</value>
</set>
</property>
<property name="map">
<map>
<entry key="java" value="spring"></entry>
<entry key="math" value="666"></entry>
</map>
</property>
</bean>
<bean id="course1" class="springTest3.Course">
<property name="name" value="ml"></property>
</bean>
<bean id="course2" class="springTest3.Course">
<property name="name" value="db"></property>
</bean>1
2
3
4
5
6
7
8
9
10
11@Test
public void test1(){
ApplicationContext context =
new ClassPathXmlApplicationContext("springTest3//inject.xml");
Stu stu = context.getBean("stu",Stu.class);
for(Course c : stu.list)
System.out.println(c.name);
for(String str : stu.map.keySet())
System.out.println(str + " " + stu.map.get(str));
}Attention:
在类内使用collections的子类时,只能使用最抽象的类(list,set,map)只有这些类在xml有对应的标签
在xml文件中使用对应的标签(list,set,map(entry))
对于一般的字符串型value使用value标签即可进行注入
对于对象型value使用ref,利用类似外部注入的方式进行注入
将类(这里以list为例)公有化:
1
2
3
4xmlns:util="http://www.springframework.org/schema/util"
xsi:schemaLocation="http://www.springframework.org/schema/beans http://www.springframework.org/schema/beans/spring-beans.xsd
http://www.springframework.org/schema/util http://www.springframework.org/schema/util/spring-util.xsd">1
2
3
4
5
6
7
8
9
10
11<util:list id="List">
<value>666</value>
<value>777</value>
<value>888</value>
</util:list>
<bean id="collect" class="springTest3.ListInjecter">
<property name="list" ref="List"></property>
</bean>Attention:
需要导入util对应的包:
xmlns:util="http://www.springframework.org/schema/util"
xsi:schemaLocation="http://www.springframework.org/schema/beans http://www.springframework.org/schema/beans/spring-beans.xsd http://www.springframework.org/schema/util http://www.springframework.org/schema/util/spring-util.xsd">
在util:list的标签内,直接添加value(若为String类型的数据)添加id属性
若为对象类的value则利用ref标签引入
在property的标签内,使用ref将公有化的标签的id进行引入
工厂Bean:
使创建的工厂类实现FactoryBean接口(not BeanFactoy)
实现接口内的函数
在getObject的函数内返回要实现的类对象
1
2
3
4
5
6
7
8
9
10
11
12
13
14
15
16
17
18
19public class UserFactory implements FactoryBean<User> {
@Override
public User getObject() throws Exception {
return new User();
}
@Override
public Class<?> getObjectType() {
return null;
}
@Override
public boolean isSingleton() {
return false;
}
}
public class User {
}1
<bean id="user" class="springTest4.UserFactory"></bean>
bean的默认单例性:
在spring中bean的管理默认为单例模式,即在任何位置使用的bean为同一个bean
对于bean的单例性的调节:
- 在xml的配置文件内进行调节
1
2
3<bean id="user" class="springTest4.UserFactory" scope="singleton"></bean> <!-- 默认单例 -->
<bean id="user" class="springTest4.UserFactory" scope="prototype"></bean> <!-- 设置多例 -->- singleton和prototype的区别:
- 对于默认scope或者指定singleton为在加载xml配置文件时就创建对象
- 对于指定prototype为在调用getBean函数时才创建对象
bean的生命周期
-
通过构造器创建bean实例(无参构造)
为bean的属性设置值和对其他bean的引用(调用set方法)
调用bean的初始化方法(需要配置初始化方法)
bean的使用
当关闭容器时,需要对bean进行销毁(需要配置销毁方法)
演示代码:
1
2
3
4<bean id="order" class="springTest5.Order" init-method="initMethod" destroy- method="destroyMethod">
<property name="name" value="ych"></property>
</bean>
1
2
3
4
5
6
7
8
9
10
11
12
13
14
15public class Order {
private String name;
public void setName(String name) {
this.name = name;
}
private void initMethod(){
System.out.println("order has createn!");
}
private void destroyMethod(){
System.out.println("order has destroied!");
}
}1
2
3
4
5
6
7
8
9
10@Test
public void test(){
ApplicationContext context =
new ClassPathXmlApplicationContext("springTest5//inject.xml");
Order order = context.getBean("order",Order.class);
System.out.println("using!");
// 销毁创建的bean
((ClassPathXmlApplicationContext)context).close(); //只有ApplicationContext的实现类有close方法
}Attention:
- 当在单例模式下可以用spring进行销毁
- 当在多例模式下不可用spring进行销毁
-
声明一个实现了BeanPostProcessor的类,并添加值配置文件
在同一个配置文件中的所有bean文件均可调用后置处理器方法:
1
2
3
4
5
6
7
8
9
10
11
12
13
14
15
16public class BeanPostPro implements BeanPostProcessor {
@Override
public Object postProcessBeforeInitialization(Object bean, String beanName) throws BeansException {
// 在构造对象之前调用
System.out.println("before construct!");
return bean;
}
@Override
public Object postProcessAfterInitialization(Object bean, String beanName) throws BeansException {
//在构造对象之后调用
System.out.println("after construct!");
return bean;
}
}1
2
3
4
5
6<bean id="order" class="springTest5.Order" init-method="initMethod" destroy-method="destroyMethod" scope="singleton">
<property name="name" value="ych"></property>
</bean>
<bean id="construct" class="springTest5.BeanPostPro"></bean>
-
- byName:需要bean的ID和待构造的Bean的属性名相同
- byType:只能满足“一对一”类型的自动装配
-
1
2
3
4
5
6
7
8
9
10
11
12
13
14
15
16
17
18
19
20
21
22
23<!-- 引入命名空间 -->
<?xml version="1.0" encoding="UTF-8"?>
<beans xmlns="http://www.springframework.org/schema/beans"
xmlns:xsi="http://www.w3.org/2001/XMLSchema-instance"
xmlns:context="http://www.springframework.org/schema/context"
xsi:schemaLocation="
http://www.springframework.org/schema/beans http://www.springframework.org/schema/beans/spring-beans.xsd
http://www.springframework.org/schema/context http://www.springframework.org/schema/context/spring-context.xsd
">
<!-- 引入配置文件 -->
<context:property-placeholder location="jdbc.properties"></context:property-placeholder>
<!-- 进行属性注入 -->
<bean id="jdbc" class="com.alibaba.druid.pool.DruidDataSource">
<property name="driverClassName" value="${prop.driverClassName}"></property>
<property name="url" value="${prop.url}"></property>
<property name="username" value="${prop.username}"></property>
<property name="password" value="${prop.password}"></property>
</bean>
</beans>- 引入命名空间(context)
- 引入配置文件
- 进行属性注入
基于注解方式
-
- @Component
- @Service
- @Controller
- @Respository
* 这四个注解的功能是一样的,都可以用来创建对象
-
引入aop的jar包,注解的使用需要aop,jar的解释
在xml中声明需要扫描注解的类(开启组件扫描):
- 若需要多个类的解决方法:
- base-package参数后的类用逗号隔开
- 若这多个类在统一目录下,将其父目录加载到base-package中
- 若需要多个类的解决方法:
在指定类的上方添加注解(Component,Conyroller,Service,Respository之一):
- 若不添加value属性,则默认value为类名,且类的的一个字母小写,否则为指定的value值
在创建bean对象时和使用xml创建方法相同
1
2
3
4
5
6
7
8
9
10
11
12
13<?xml version="1.0" encoding="UTF-8"?>
<beans xmlns="http://www.springframework.org/schema/beans"
xmlns:context="http://www.springframework.org/schema/context"
xmlns:xsi="http://www.w3.org/2001/XMLSchema-instance"
xsi:schemaLocation="
http://www.springframework.org/schema/beans http://www.springframework.org/schema/beans/spring-beans.xsd
http://www.springframework.org/schema/context http://www.springframework.org/schema/context/spring-context.xsd
">
<context:component-scan base-package="springTest7"></context:component-scan>
</beans>1
2
3
4
5
6@Component(value = "user")
public class User {
public void start(){
System.out.println("hello world!");
}
}1
2
3
4
5
6
7@Test
public void test(){
ApplicationContext context =
new ClassPathXmlApplicationContext("springTest7//scan.xml");
User user = context.getBean("user",User.class);
user.start();
}
-
默认filter:对指定文件中的所有关键词注解进行扫描
指定filter:仅对指定的filter进行扫描 / 不扫描:
1
2
3
4
5
6
7
8<!-- 指定扫描 -->
<context:component-scan base-package="springTest7">
<context:exclude-filter type="annotation" expression="org.springframework.stereotype.Controller"/>
</context:component-scan>
<!-- 指定不扫描 -->
<context:component-scan base-package="springTest7" use-default-filters="false">
<context:include-filter type="annotation" expression="org.springframework.stereotype.Controller"/>
</context:component-scan>* **当为指定扫描时,需要将默认扫描(use-default-filters)改为false** * **当为指定不扫描时,无需设置**
-
-
- @AutoWire:根据属性的类型进行自动注入
- @Qualifier:根据属性的名称进行注入
- @Resource:既可以根据类型注入也可以根据名称进行注入
- @Value:普通类型的注入
-
- 按照类型进行注入,直接在指定属性上添加该注解即可(只能当指定的类型只存在一个时,当存在多个候选的类型时不能使用该方法进行属性注入)
-
按照名称进行注入
使用Qualifier时必须在其上添加AutoWire注解,即两个注解同时使用
1
2
3@Autowired // 必须先添加AutoWire注解,若无该注解则无法使用Qualifier
@Qualifier(value = "user")
private UserDao user;
-
- 既可以根据类型进行注入,也可以根据指定的名称进行注入。
- 不是Spring包中的功能,是javax中的annoation的
- Spring不推荐
-
- 注入普通类型(非特殊对象类注入)
-
-
完全使用注解进行开发,完全不使用xml
步骤:
创建配置类并添加配置注解
加载配置类
创建bean对象
1
2
3
4
5
6// 注解类
@Configuration
@ComponentScan(basePackages = {"springTest9"})
public class Config {
}1
2
3
4
5
6
7
8@Repository
public class User implements UserDao{
@Override
public void show() {
System.out.println("666");
}
}1
2
3
4
5
6
7
8
9
10
11@Service
public class UserService {
@Autowired
private UserDao user;
public void show(){
user.show();
System.out.println("777");
}
}1
2
3
4
5
6
7
8
@Test
public void test(){
ApplicationContext context =
new AnnotationConfigApplicationContext(Config.class); // 此处改为Annotation的子实现类
UserService user = context.getBean("userService",UserService.class);
user.show();
}
AOP模块
AOP基本概念
-
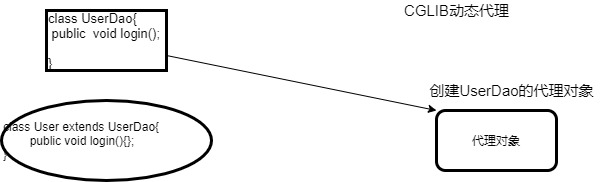
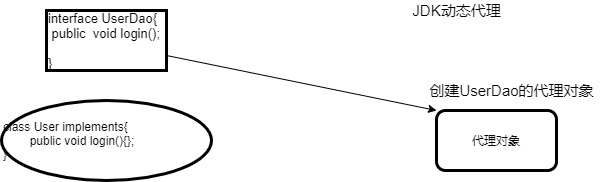
- 两种情况的动态代理:
- 有接口的情况,使用JDK的动态代理
- 无接口的情况,使用CGLIB的动态代理
- 两种情况的动态代理:
-
连接点:
类中哪些方法可以被增强,哪些方法就称为连接点(候选方法)
切入点
类内实际被增强的方法称为切入点(实际增强方法)
通知(增强)
- 实际增强的逻辑部分被称为通知(增强)
- 通知有很多类型:
- 前置通知
- 后置通知
- 环绕通知
- 异常通知(exception)
- 最终通知(finally)
切面
把通知应用到切入点的过程称为切面
JDK动态代理
##### Class Proxy
-
static Obcejct newProxyInstance(ClassLoader loader,类<?>[] interfaces ,InvocaionHandler h):
parameters:
- loader:类加载器
- interfaces:增强方法所在的类,这个类实现的接口,该接口可以为多个接口
- h(InvocationHandler):实现Invocatiion的接口,创建代理的对象,实现对象增强的部分
1
2
3
4
5
6
7
8
9
10
11
12
13
14
15
16
17
18
19
20
21
22
23public class JDKProxy {
public static void main(String[] args) {
Class []interfaces = {UserDao.class};
UserDao user = new UserDaoImpl();
UserDao user1 = (UserDao) Proxy.newProxyInstance(JDKProxy.class.getClassLoader(), interfaces, new InvocationHandler() {
private Object obj = user;
public Object invoke(Object proxy, Method method, Object[] args) throws Throwable {
System.out.println("hello");
Object res = method.invoke(obj,args);
System.out.println("world");
return new Integer(6);
}
});
System.out.println(user1.intInter(1,2));
}
}
AOP操作(准备)
-
什么是AspectJ:
AspectJ不是Spring的组成部分,独立的AOP框架,一般把AspectJ和Spring一起使用,进行AOP操作
基于AspectJ实现AOP操作
-
切入点表达式的作用:知到对类内的哪个方法进行增强
语法结构:
execution(【权限修饰符】【返回类型】【类全路径】【方法名称】(【参数列表】))
举例说明:
说明:
- *代表所有的权限
- 返回类型可以省略
- .*代表其中的所有
- 参数列表用..进行代替
对指定类的指定方法做增强:
excution(* spirngTest8.User,add(..))
对指定类的所有方法做增强:
excution(* sprintTest8.User.*(..))
对指定包的所有类的所有方法做增强:
excution(* springTest8..(..))
基于注解的AspectJ的AOP操作(推荐使用方法)
-
1
2
3
4
5
6
7
8
9
10
11
12
13
14
15
16<?xml version="1.0" encoding="UTF-8"?>
<beans xmlns="http://www.springframework.org/schema/beans"
xmlns:context="http://www.springframework.org/schema/context"
xmlns:aop="http://www.springframework.org/schema/aop"
xmlns:xsi="http://www.w3.org/2001/XMLSchema-instance"
xsi:schemaLocation="
http://www.springframework.org/schema/beans http://www.springframework.org/schema/beans/spring-beans.xsd
http://www.springframework.org/schema/context http://www.springframework.org/schema/context/spring-context.xsd
http://www.springframework.org/schema/aop http://www.springframework.org/schema/aop/spring-aop.xsd
">
<context:component-scan base-package="sprintTest12"></context:component-scan>
<aop:aspectj-autoproxy proxy-target-class="true"></aop:aspectj-autoproxy>
</beans> -
1
2
3
4
5
6
7
@Configuration
@ComponentScan(basePackageClasses = {Order.class, OrderPorxy.class})
@EnableAspectJAutoProxy(proxyTargetClass = true) // 进行AOP配置
public class Config {
} -
1
2
3
4
5
6
7
8
9@Component
@Aspect //声明为AOP切口代理
public class OrderProxy {
@Before(value = "execution(* sprintTest12.Order.add(..))")
void before(){
System.out.println("world");
}
} -
在进行aop的引入时,需要将proxy-target-class声明为TRUE
<tx:annotation-driven transaction-manager="transactionManager" proxy-target-class="true"/> 注意:proxy-target-class属性值决定是基于接口的还是基于类的代理被创建。如果proxy-target-class 属性值被设置为false,那么基于类的代理将起作用(这时需要cglib库)。如果proxy-target-class属值被设置为true,那么标准的JDK 基于接口的代理将起作用。
即使你未声明 proxy-target-class="true" ,但运行类没有继承接口,spring也会自动使用CGLIB代理。
高版本spring自动根据运行类选择 JDK 或 CGLIB 代理
-
无异常情况:
around before..
before Method around after after.. after returning..
有异常情况:
around before..
before after.. throwing
-
- @before 前置通知
- @after 最终通知
- @afterReturning 后置通知
- @around 环绕通知
- @afterThrowing 异常通知
-
对相同的execution进行抽取,并合并使用
方法:
构建切入点函数
填充
1
2
3
4
5
6
7
8
9
10
11
12
13
14
15
16
17
18
19
20
21
22
23
24
25
26
27
28
29
30
31
32
33@Pointcut(value = "execution(* springTest13.Order.show(..))") // 构切入点函数
void pointCutDemo(){}
// 利用切入点函数进行填充
@Before(value = "pointCutDemo()")
void before(){
System.out.println("before");
}
@After(value = "pointCutDemo()")
void after(){
System.out.println("after..");
}
@AfterReturning(value = "pointCutDemo()")
void afterReturning(){
System.out.println("after returning..");
}
@Around(value = "pointCutDemo()")
void round(ProceedingJoinPoint proceedingJoinPoint) throws Throwable {
System.out.println("around before..");
proceedingJoinPoint.proceed();
System.out.println("around after");
}
@AfterThrowing(value = "pointCutDemo()")
void afterThrow(){
System.out.println("throwing");
}
-
- 若value的值越小则优先级越高
-
1
2
3
4
5
6
7
8
@Configuration
@ComponentScan(basePackageClasses = {Order.class, OrderPorxy.class})
@EnableAspectJAutoProxy(proxyTargetClass = true)
public class Config {
}
基于xml文件的AspectJ的配置方式
1 | |
JDBCTemplate模块
JDBCTemplate基本概念
JDBCTemplate相关配置
1 | |
对于其余部分为:
JDBCTemplate -> Dao -> Service
tips:针对MYSQL的URL形式
jdbc:mysql://localhost:
/
利用JDBCTemplate进行(增删改)操作
1 | |
1 | |
1 | |
1 | |
1 | |
利用JDBCTemplated对数据库进行查询操作
-
利用JDBCTemplate封装的queyForObject函数,返回单个值
-
- 第一个参数:sql语句
- 第二个参数:返回的对象类型的class
1
2
3
4
5
6@Override
public void selectSet(Customer cus) {
String sql = "select count(*) from customers";
Integer res = jdbcTemplate.queryForObject(sql,Integer.class);
System.out.println(res);
} -
-
-
- 第一个参数:sql语句
- 第二个参数:
- 实现类RowMapper的接口的类(ex:BeanPropertyRowMapper)
- 模板类别为数据库返回类型的类别
- 第三个参数:填充参数
1
2
3
4
5
6@Override
public void getTuple(String name) {
String sql = "select * from customers where name=?;";
Customer cus = jdbcTemplate.queryForObject(sql,new BeanPropertyRowMapper<Customer>(Customer.class),name);
System.out.println(cus.getName());
} -
-
-
- 第一个参数:sql语句
- 第二个参数:RowMapper的接口实现类
- 第三个参数:填充字符
1
2
3
4
5
6
7@Override
public void findTuples() {
String sql = "select * from customers;";
List<Customer> customerList = jdbcTemplate.query(sql,new BeanPropertyRowMapper<Customer>(Customer.class));
for(Customer cus : customerList)
System.out.println(cus.getName());
} -
利用JDBCTemplate实现批量操作
-
一个Object数组对象为一个元组,一个Objecr对象为一个属性
1
2
3
4
5
6@Override
public void addBatch(List<Object[]> list) {
String sql = "insert into customers (id) values (?);";
int res[] = jdbcTemplate.batchUpdate(sql,list);
System.out.println(Arrays.toString(res));
}
利用JBDCTemplate实现事物管理
-
事物是数据库操作的基本单元,逻辑上的一组操作
-
- 原子性
- 一致性
- 分离性
- 持久性
-
- 事物一般添加到Service层(WEB层,Service层,Dao层)
-
- 编程式事物管理(不推荐)
- 声明式事物管理(底层使用了AOP的模式):
- xml方式
- 注解方式
基于注解的事务管理
-
引入tx的命名空间
声明事物控制器的bean模块,并注入dataSource
通过事物控制器打开注解驱动
在事物类上或事物的方法上添加事物注解
1
2
3
4
5
6
7
8
9
10
11
12
13
14
15
16
17
18
19
20
21
22
23
24
25
26
27
28
29
30
31
32
33
34
35
36
37
38
39
40
41
42<?xml version="1.0" encoding="UTF-8"?>
<beans xmlns="http://www.springframework.org/schema/beans"
xmlns:xsi="http://www.w3.org/2001/XMLSchema-instance"
xmlns:context="http://www.springframework.org/schema/context"
xmlns:tx="http://www.springframework.org/schema/tx"
xmlns:util="http://www.springframework.org/schema/util"
xsi:schemaLocation="
http://www.springframework.org/schema/beans http://www.springframework.org/schema/beans/spring-beans.xsd
http://www.springframework.org/schema/context http://www.springframework.org/schema/context/spring-context.xsd
http://www.springframework.org/schema/util http://www.springframework.org/schema/util/spring-util.xsd
http://www.springframework.org/schema/tx http://www.springframework.org/schema/tx/spring-tx.xsd
">
<context:component-scan base-package="springTest15"></context:component-scan>
<util:properties id="prop" local-override="true" location="jdbc.properties"></util:properties>
<bean id="dataSource" class="com.alibaba.druid.pool.DruidDataSource">
<property name="url" value="#{prop.url}"></property>
<property name="username" value="#{prop.username}"></property>
<property name="password" value="#{prop.password}"></property>
<property name="driverClassName" value="#{prop.driverClassName}"></property>
</bean>
<bean id="jdbcTemplate" class="org.springframework.jdbc.core.JdbcTemplate">
<property name="dataSource" ref="dataSource"></property>
</bean>
/////////////////////////////////////////////////////////////////////////////////////////////////////////
<bean id="transactionManager" class="org.springframework.jdbc.datasource.DataSourceTransactionManager">
<property name="dataSource" ref="dataSource"></property>
</bean>
<tx:annotation-driven transaction-manager="transactionManager"></tx:annotation-driven>
</beans>
<!--
url=jdbc:mysql://localhost:3307/test
username=root
password=ych3362632
driverClassName=com.mysql.jdbc.Driver
-->1
2
3
4
5
6
7
8
9
10
11
12
13
14
15
16
17
18
19
20
21
22
23
24@Component
@Transactional
public class UserService {
@Autowired
private UserDao customer;
private void addMoney(String name,int m){
customer.addMoney(name,m);
}
private void relasMoney(String name,int m){
customer.relasMoney(name,m);
}
public void getPostMoney(String name1,String name2,int m){
addMoney(name2,m);
int e = 10 / 0;
relasMoney(name1,m);
}
}
-
propgation:传播行为
ioslation:事物的隔离级别:
【错误】脏读:一个未提交的事物读取了另一个未提交的事物(当被读的事物发生了rollback则导致数据不正确)
【现象非问题】幻读:一个未提交的事物读取了另一个事物添加的数据
【现象非问题】不可重复读:一个未提交的事物读取了另一个事物已经提交的数据
设置隔离级别:
脏读 不可重复读 幻读 READ UNCOMMITTED(读未提交) √ √ √ READ COMMITTED(读已提交) × √ √ REPEATABLE READ(可重复读)【MySQL默认】 × × √ SERILIZABLE(串行化) × × × timeout:超时时间:
- 事物需要在一定的时间内进行提交,如果不提交则进行回滚
- 默认值-1(不超时),设置时间以秒为单位
readOnly:是否只读:
- readOnly默认值为false,可进行增删改查
- 若设置为true,则只能查询
rollbackFor:设置出现哪些异常进行回滚
noRollbackFor:设置出现哪些异常不进行回滚
基于xml的事物管理
-
1
2
3
4
5
6
7
8
9
10
11
12
13
14
15
16
17
18
19
20
21
22
23
24
25
26
27
28
29
30
31
32
33
34
35
36
37
38
39
40
41
42
43
44
45
46
47<?xml version="1.0" encoding="UTF-8"?>
<beans xmlns="http://www.springframework.org/schema/beans"
xmlns:context="http://www.springframework.org/schema/context"
xmlns:aop="http://www.springframework.org/schema/aop"
xmlns:tx="http://www.springframework.org/schema/tx"
xmlns:util="http://www.springframework.org/schema/util"
xmlns:xsi="http://www.w3.org/2001/XMLSchema-instance"
xsi:schemaLocation="
http://www.springframework.org/schema/beans http://www.springframework.org/schema/beans/spring-beans.xsd
http://www.springframework.org/schema/aop http://www.springframework.org/schema/aop/spring-aop.xsd
http://www.springframework.org/schema/context http://www.springframework.org/schema/context/spring-context.xsd
http://www.springframework.org/schema/util http://www.springframework.org/schema/util/spring-util.xsd
http://www.springframework.org/schema/tx http://www.springframework.org/schema/tx/spring-tx.xsd
">
<util:properties id="prop" location="jdbc.properties" local-override="true"></util:properties>
<bean id="dataSource" class="com.alibaba.druid.pool.DruidDataSource">
<property name="url" value="#{prop.url}"></property>
<property name="driverClassName" value="#{prop.driverClassName}"></property>
<property name="password" value="#{prop.password}"></property>
<property name="username" value="#{prop.username}"></property>
</bean>
<context:component-scan base-package="springTest16"></context:component-scan>
<bean id="jdbcTemplate" class="org.springframework.jdbc.core.JdbcTemplate">
<property name="dataSource" ref="dataSource"></property>
</bean>
<bean id="transactionManager" class="org.springframework.jdbc.datasource.DataSourceTransactionManager">
<property name="dataSource" ref="dataSource"></property>
</bean>
<tx:advice id="txadvice">
<tx:attributes>
<tx:method name="getPostMoney" propagation="REQUIRED"/>
</tx:attributes>
</tx:advice>
<aop:config>
<aop:pointcut id="pt" expression="execution(* springTest16.UserService.getPostMoney(..))"/>
<aop:advisor advice-ref="txadvice" pointcut-ref="pt"></aop:advisor>
</aop:config>
</beans>
完全注解开发
-
- 创建配置类
- 填充配置函数
- 完成配置
1
2
3
4
5
6
7
8
9
10
11
12
13
14
15
16
17
18
19
20
21
22
23
24
25
26
27
28
29
30
31
32
33
34
35
36
37
38
39
40
41
42
43
44
45
46
47
48
49
50
51
52
53
@Configuration
@ComponentScan(basePackages = {"springTest17"})
@EnableTransactionManagement
public class Config {

    @Bean
    public DruidDataSource getDataSource(){
        DruidDataSource dataSource = new DruidDataSource();
        Properties prop = new Properties();
        FileInputStream fis = null;
        try {
            fis = new FileInputStream("src//jdbc.properties");
            prop.load(fis);
            dataSource.setUrl(prop.getProperty("url"));
            dataSource.setUsername(prop.getProperty("username"));
            dataSource.setPassword(prop.getProperty("password"));
            dataSource.setDriverClassName(prop.getProperty("driverClassName"));


        } catch (IOException e) {
            e.printStackTrace();
        }finally {
            try {
                fis.close();
            } catch (IOException e) {
                e.printStackTrace();
            }
            return dataSource;
        }


    }


    @Bean
    public JdbcTemplate getJdbcTemplate(){
        JdbcTemplate jdbcTemplate = new JdbcTemplate();
        jdbcTemplate.setDataSource(getDataSource());
        return jdbcTemplate;
    }

    @Bean
    public DataSourceTransactionManager getDataSourceTransactionManager(){
        DataSourceTransactionManager dataSourceTransactionManager = new DataSourceTransactionManager();
        dataSourceTransactionManager.setDataSource(getDataSource());
        return dataSourceTransactionManager;
    }

}
1
2
3
4
5
6
7
8
9
10
11
12
13
14
15
16
@Component
public class UserDaoImpl implements UserDao{

    @Autowired
    private JdbcTemplate jdbcTemplate;

    @Override
    public void show() {
        String sql = "select * from customers;";
        List<User> list = jdbcTemplate.query(sql,new BeanPropertyRowMapper<User>(User.class));
        for(User user : list)
            System.out.println(user.getName());
    }
}
补充
工厂模式
普通模式:
1 | |
工厂模式:
1 | |
在工厂模式的情况下进一步解耦合
1 | |
注解
动态代理
有接口的动态代理(JDK动态代理)
- 通过实现接口类的方法来增强类的对象
无接口的动态代理(CGLIB动态代理)
通过实现子类的方法来增强类