
SpringBoot Note
SpringBoot Note
JsonIgnore
- 当该注解属性所在的对象返回时,不将该属性放入JSON串内
- 常用于隐私保护(密码等)
介绍
SpringBoot是Spring提供的子项目,用于快速构建Spring应用程序
其他基于Spring Framework的子项目:
- Spring Data:用于数据获取
- Spring Security:用于授权认证
- Spring AMQP:用于消息传递
- Spring Cloud:用于服务治理
SpringBoot优势
起步依赖 初始化导入的boot依赖坐标,简化了pom文件其他文件的引入和版本配置,简化了MVC的开发过程
自动配置
在boot程序启动后,自动将Controller等Bean对象创建并放入IOC容器中,不需要手动配置加载
其他特性
- 内嵌Tomcat Jetty等服务器插件
- 外部化配置:当打包为Jar包后,若需要调整配置,直接修改外部配置文件即可
- 不要冗杂的配置文件:配置文件少,不需要大量的propertis和yml/yaml
手动快速搭建Springboot项目
此处仅实现通过穿件Maven项目来实现springboot项目的搭建,另外可以轮椅式利用IDEA快速实现springboot项目
创建Maven工程
- 项目路径实现完整:
- main
- java
- resource
- static
- templates
- application.properties
- static
- java
- test
- pom.xml
- main
- 项目路径实现完整:
修改pom文件
- 添加parent和必要的依赖项
1
2
3
4
5
6
7
8
9
10
11
12
13
14
15
16
17
18
19
20
21
22
23
24
25
26
27
28
29<parent>
<groupId>org.springframework.boot</groupId>
<artifactId>spring-boot-starter-parent</artifactId>
<version>2.7.6</version>
<relativePath/> <!-- lookup parent from repository -->
</parent>
<dependencies>
<dependency>
<groupId>org.springframework.boot</groupId>
<artifactId>spring-boot-starter-web</artifactId>
</dependency>
<dependency>
<groupId>org.springframework.boot</groupId>
<artifactId>spring-boot-starter-test</artifactId>
<scope>test</scope>
</dependency>
</dependencies>
<build>
<plugins>
<plugin>
<groupId>org.springframework.boot</groupId>
<artifactId>spring-boot-maven-plugin</artifactId>
</plugin>
</plugins>
</build>- 实现boot启动项
1
2
3
4
5
6
7
8
9
@SpringBootApplication
public class DemoApplication {
public static void main(String[] args) {
System.out.println("hello run");
SpringApplication.run(DemoApplication.class, args);
}
}
配置文件
properties 【不常用】
yaml/yml 【常用(简洁,清晰)】
- 配置信息的书写和获取
- 第三方配置信息的书写与获取
- 自定义配置信息
- 配置信息的书写和获取
整合Mybatis
步骤
- 引入mybatis的起步依赖以及数据库连接依赖
1
2
3
4
5
6
7
8
9
10<dependency>
<groupId>org.mybatis.spring.boot</groupId>
<artifactId>mybatis-spring-boot-starter</artifactId>
<version>2.1.3</version>
</dependency>
<dependency>
<groupId>mysql</groupId>
<artifactId>mysql-connector-java</artifactId>
</dependency>- 在application配置文件中配置JDBC相关连接信息
1
2
3
4
5
6
spring:
datasource:
driver-class-name: com.mysql.cj.jdbc.Driver
url: jdbc:mysql://localhost:3306/boot_mybatis_test
username: root
password: ych3362632
SpringBoot中Bean对象的管理
对于组件扫描,组件注册,详见Annotation Points
自动配置
自动配置即:遵循约定大约配置的原则,在boot程序启动后,起步依赖中的一些bean对象会自动注入到ioc容器
- 流程:
Springboot扫描自动配置流程:
- Springbootapplication注解
- EnableConfiuration注解
- Selector注解
以上注解为Boot注解集成,以下是依赖中需要添加的部分
- 需要导包的地方添加AutoConfiguration注解(autofiguration注解集成了Configuration注解)
- 添加META-INF目录,在目录中添加依赖扫描文件(factories/imports)
- 因此如果需要添加自定义的依赖自动配置只需要添加META-INF部分和autofiguration部分
- 流程:
自定义Starter
应用场景:需要提供公共的组件,将该组件封装为springboot中starter
starter组件:
autoConfiguration
使用自动配置流程添加自动配置对象
starter
将autoconfiguration需要的依赖复制一份,并额外添加自动配置依赖
全局异常处理器
在 Spring Framework 中,全局异常处理器(Global Exception Handler)是一种机制,用于捕获应用程序中未被处理的异常,并统一处理这些异常,以便在发生异常时返回统一的错误响应或执行特定的异常处理逻辑。通过全局异常处理器,可以避免在每个控制器或服务方法中重复编写异常处理代码,提高代码的可维护性和可重用性。
以下是在 Spring 中实现全局异常处理器的常见方式:
使用 @ControllerAdvice 注解
@ControllerAdvice 是 Spring MVC
提供的一个注解,用于定义全局控制器通知(global controller
advice)。可以结合 @ExceptionHandler
注解来捕获指定类型的异常并处理。
1 | |
在上面的例子中,GlobalExceptionHandler 类使用
@ControllerAdvice 注解标识为全局异常处理器。通过
@ExceptionHandler
注解可以定义多个方法来处理不同类型的异常。在方法内部可以根据具体异常类型执行相应的处理逻辑,并返回自定义的错误响应。
处理方式
@ExceptionHandler(Exception.class):捕获所有类型的异常,并返回内部服务器错误(500)的响应。@ExceptionHandler(NotFoundException.class):捕获自定义的NotFoundException异常,并返回资源未找到(404)的响应。
在配置中激活全局异常处理器
要使全局异常处理器生效,需要在 Spring 配置中激活
@ControllerAdvice 注解的扫描:
1 | |
在上面的配置中,通过 @ComponentScan
注解指定了需要扫描的控制器包路径,Spring 会自动扫描并识别带有
@ControllerAdvice
注解的类,并将其注册为全局异常处理器。
通过以上配置和实现,就可以在 Spring 应用程序中使用全局异常处理器来统一处理应用程序中抛出的异常,确保异常处理逻辑的一致性和可维护性。
Spring Validation
- 作用:Spring 提供的参数校验的框架,使用预定义的注解完成参数的校验
- 步骤:
- 添加Spring Validation起步依赖
- 在参数前添加Pattern注解
- 在相应的Controller上添加Validated注解
- 由于若不满足验证,直接抛出的为异常,因此可以配合spring mvc中的全局异常处理器进行异常的捕获
JWT令牌
令牌:即一串可以被验证的加密字符串
功能:
- 承载业务数据, 减少后续请求查询数据库的次数
- 防篡改, 保证信息的合法性和有效性
JWT令牌:
全称:JSON Web Token
组成:
- Header:记录令牌类型,加密算法
- Payload:有效载荷,携带默认信息,自定义信息
- Signature:签名,防止被篡改提高安全性,将header和payload加入其中一起加密/解密,通过指定算法进行计算
使用步骤:
- 引入依赖
1
2
3
4
5<dependency>
<groupId>com.auth0</groupId>
<artifactId>java-jwt</artifactId>
<version>4.4.0</version>
</dependency>- 构建JWT(签名在加密和解密时需要保持一致)
1
2
3
4String jwt = JWT.create().
withClaim("user",objMap).
withExpiresAt(new Date(System.currentTimeMillis() + 1000*60*60*3)).
sign(Algorithm.HMAC256("ych")); // 签名位置- 验证token
1
2
3
4JWTVerifier verifier = JWT.require(Algorithm.HMAC256("ych").build());
DecodedJWT deocder = verifier.verify(token);
// decoder即解密后的JSON内容
User user = docoder.getClaims();
基于注解的Interceptor配置
步骤:
- 创建拦截器实例类并实现接口
1
2
3
4
5
6
7
8
9
10
11
12
13
14
15
16
17
18
19
20
21
22
23
24
25
26
27
28
29
30
31
32
33
34
35
36
37
38
39
40
41
42
43
44
45
46
47
48
49
50
51package com.example.proj.interceptor;
import com.example.proj.utils.JWTUtils;
import org.springframework.stereotype.Component;
import org.springframework.web.servlet.HandlerInterceptor;
import org.springframework.web.servlet.ModelAndView;
import javax.servlet.http.HttpServletRequest;
import javax.servlet.http.HttpServletResponse;
import java.util.Map;
import static com.example.proj.utils.Contain.JWT_TOKEN_ATTR;
/**
* \* Created with IntelliJ IDEA.
* \* User: ych.
* \* Date: 2024/5/2
* \* Time: 23:15
* \* Description:
* \
*/
@Component
public class UserInterceptor implements HandlerInterceptor {
@Override
public boolean preHandle(HttpServletRequest request, HttpServletResponse response, Object handler) throws Exception {
// System.out.println("intering...");
String token = request.getHeader(JWT_TOKEN_ATTR);
System.out.println(token);
try{
Map<String,Object> claims = JWTUtils.parseToken(token);
return true;
}catch (Exception e){
e.printStackTrace();
response.setStatus(401);
return false;
}
// return HandlerInterceptor.super.preHandle(request, response, handler);
}
@Override
public void postHandle(HttpServletRequest request, HttpServletResponse response, Object handler, ModelAndView modelAndView) throws Exception {
HandlerInterceptor.super.postHandle(request, response, handler, modelAndView);
}
@Override
public void afterCompletion(HttpServletRequest request, HttpServletResponse response, Object handler, Exception ex) throws Exception {
HandlerInterceptor.super.afterCompletion(request, response, handler, ex);
}
}- 创建配置类,实现WebMvcConfig接口,将拦截器添加
- 根据需要excluded相应路径
1
2
3
4
5
6
7
8
9
10
11
12
13
14
15
16
17
18
19
20
21
22
23
24
25
26
27
28
29package com.example.proj.config;
import com.example.proj.interceptor.UserInterceptor;
import org.springframework.beans.factory.annotation.Autowired;
import org.springframework.context.annotation.Configuration;
import org.springframework.web.servlet.config.annotation.InterceptorRegistry;
import org.springframework.web.servlet.config.annotation.WebMvcConfigurer;
/**
* \* Created with IntelliJ IDEA.
* \* User: ych.
* \* Date: 2024/5/2
* \* Time: 23:22
* \* Description:
* \
*/
@Configuration
public class WebConfig implements WebMvcConfigurer {
@Autowired
private UserInterceptor userInterceptor;
@Override
public void addInterceptors(InterceptorRegistry registry) {
registry.addInterceptor(userInterceptor).excludePathPatterns("/user/login","/user/register");
}
}
实体类相关操作
Camel配置
作用:开启驼峰命名和下划线命名的自动转换,便于数据库和实体类的映射
步骤:
在springboot配置文件开启自动转换
1
2
3
4
mybatis:
configuration:
map-underscore-to-camel-case: true
JsonIgnore
- 当该注解属性所在的对象返回时,不将该属性放入JSON串内
- 常用于隐私保护(密码等)
lombok相关
- Data
- NoArgsConstructor
- AllArgsConstructor
ThreadLocal
- 作用:
- 提供线程局部变量
- 提供set/get方法
- 使用TreadLocal存储数据保证了线程的安全
实体参数校验
- 基于Validation注解集
| 注解 | 作用 |
|---|---|
| NotNull | 值不能为null |
| NotEmpty | 值不能为null且不能为空(限定字符串) |
| 值必须符合email约束 | |
| Pattern | - |
步骤:
- 在实体类中添加相应的属性注解
1
2
3
4
5
6
7
8
9
10
11
12
13
14
15
16
17
18
19
20
21
22
23
24
@Data
public class User {
@NotNull
private Integer id;//主键ID
private String username;//用户名
@JsonIgnore
private String password;//密码
@NotEmpty
private String nickname;//昵称
@NotEmpty
@Email
private String email;//邮箱
private String userPic;//用户头像地址
private LocalDateTime createTime;//创建时间
private LocalDateTime updateTime;//更新时间
}- 在传参的相应实体类位置添加Validated注解
1
2
3
4
5
6
7
8@RequestMapping("/updateInfo")
public Result updateInfo(@RequestBody @Validated User user){
System.out.println(user.getUsername());
// user.setPassword(Md5Util.getMD5String(user.getPassword()));
user.setUpdateTime(LocalDateTime.now());
userService.updateUserInfo(user);
return Result.success("更新成功");
}
分组校验
作用:对校验项进行分组,对于不同的校验项指定不同的校验流程,使得校验分离
步骤:
- 定义分组
- 定义校验项时指定的分组
1
2
3
4
5
6
7
8
9
10
11
12
13
14
15
16
17
18
19
20
21
22
23
24
25
26
27
28
29
30@Data
public class Category {
public interface Update{
}
public interface Add{
}
@NotNull(groups = Update.class)
private Integer id;//主键ID
@NotEmpty(groups = {Add.class,Update.class})
private String categoryName;//分类名称
@NotEmpty(groups = {Add.class,Update.class})
private String categoryAlias;//分类别名
// @NotNull(groups = Add.class)
private Integer createUser;//创建人ID
@JsonFormat(pattern = "yyyy-MM-dd HH:mm:ss")
private LocalDateTime createTime;//创建时间
@JsonFormat(pattern = "yyyy-MM-dd HH:mm:ss")
private LocalDateTime updateTime;//更新时间
}- 校验时使用的校验组别
1
2
3
4
5
6
7
8
9
10
11
12
13
14
15
16
17
18
19@RequestMapping("/add")
public Result addCategory(@RequestBody @Validated(Category.Add.class) Category category){
category.setCreateTime(LocalDateTime.now());
category.setUpdateTime(LocalDateTime.now());
Map<String,Object> claims = ThreadLocalUtil.get();
int userID = (int) claims.get("id");
category.setCreateUser(userID);
categoryService.addCategory(category);
System.out.println("sucee!");
return Result.success("创建成功!");
}
@RequestMapping("/update")
public Result updateCategory(@RequestBody @Validated(Category.Update.class) Category category){
category.setUpdateTime(LocalDateTime.now());
categoryService.updateCategory(category);
return Result.success("更新成功!");
}
自定义校验
作用:已有的校验注解无法满足需求,需要自定义校验参数
步骤:
- 自定义注解
1
2
3
4
5
6
7
8
9
10
11
12
13
14
15
16
17@Target({ElementType.METHOD, ElementType.FIELD, ElementType.ANNOTATION_TYPE, ElementType.CONSTRUCTOR, ElementType.PARAMETER, ElementType.TYPE_USE})
@Retention(RetentionPolicy.RUNTIME)
@Documented
@Constraint(
validatedBy = {StateValidation.class} // 提供校验规则的类
)
public @interface State {
// 提供校验失败的提示信息
String message() default "state参数不合理";
// 指定分组
Class<?>[] groups() default {};
// 负载,获取注解的附加信息
Class<? extends Payload>[] payload() default {};
}- 封装一个类实现ConstraintValidator接口
1
2
3
4
5
6
7
8
9
10
11
12
13public class StateValidation implements ConstraintValidator<State,String> {
// 提供校验规则
@Override
public boolean isValid(String s, ConstraintValidatorContext constraintValidatorContext) {
if (s == null)
return false;
else if (s.equals("已发布") || s.equals("草稿"))
return true;
return false;
}
}- 在需要校验的位置添加该自定义的注解
在Springboot中使用动态SQL映射
- 对于复杂的查询操作,基于注解的sql操作无法适应,因此需要使用动态sql
- 步骤:
- 在resource目录下添加与java目录下相同的mapper文件夹路径

- 在该路径下添加与mapper接口名相同的xml映射文件
- 在映射文件中的namespace中添加mapper的全类名
1
2
3
4
5
6
7
8
9
10
11
12
13
14
15
16
17
18
19
20
21<?xml version="1.0" encoding="UTF-8" ?>
<!DOCTYPE mapper
PUBLIC "-//mybatis.org//DTD Mapper 3.0//EN"
"http://mybatis.org/dtd/mybatis-3-mapper.dtd">
<mapper namespace="com.example.proj.mapper.ArticleMapper"> <!-- 全类名 -->
<select id="getListById" resultType="com.example.proj.pojo.Article">
select *
from article
<where>
<if test="categoryID!=null">
and category_id = #{categoryID}
</if>
<if test="state!=null">
and state = #{state}
</if>
and create_user = #{userID}
</where>
</select>
</mapper>
令牌主动失效机制
- 需求:给浏览器相应令牌的同时,把该令牌存储到redis中,通过比较与redis中的区别来验证令牌是否有效
SpringBoot集成Redis
- link:
SpringBoot部署及配置文件分组
配置文件优先级
- 项目中resources目录下的application.yml
- Jar包所在目录下的application.yml
- 操作系统环境变量
- 命令行参数
多环境开发
- 一般在实际开发过程中开发 → 测试 → 测试过程需要不同的配置文件,或配置文件的参数是不同的,因此需要进行配置文件或开发环境的分离,若均写在一个配置文件中,则不同的应用场景下调整过于复杂,因此需要进行多环境开发的配置
- 方法:
使用”- - - “进行分割:
- demo-1
1
2
3
4
5
6
7
8
9
10
11
12
13
14
15
16
17
18#spring.application.name=proj
spring:
profiles:
active: dev
---
spring:
config:
activate:
on-profile:dev
---
spring:
config:
activate:
on-profile:test
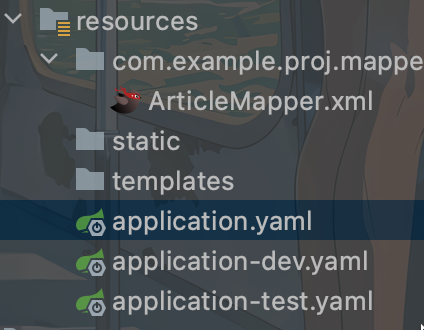
使用不同的文件后缀
- 例如将配置文件分为:
- application-dev.yaml
- application-test.yaml
- application-pro.yaml
- 在主文件application.yaml中选择指定的配置文件即可
- demo-2
1
2
3
spring:
profiles:
active: dev- 例如将配置文件分为: